Blog Taking A Break

First and for most, I would like to extend a thank you from me and everyone here at Wilckens Woodworking for you reading our weekly blog, the Saturday Update, and keeping up with us as we strive to bring you the best fretwork designs around. Now to the point, for the time being we will no longer post the weekly update on the website/blog. The Saturday Updates will still continue, but in their original email form. So, if you are not signed up for the email updates and you would like to receive them, just shoot over an email to dan@wilckenswoodworking.net saying that you would like to be added to the Saturday Update emails. Thanks again and we hope you will keep up with us.

….keep the saw dust flyin’.

Saturday Update 10/19/13

Hello….hope everyone had a good week last week and an awesome Saturday. It was a chilly start here but warmed up comfortably. Started off my day by stopping in at Metro for the wood to start the next clock. I am starting on the Bechthold Clock Which was designed back in 2007 for a good friend of Wilckens Woodworking….Wayne Bechthold. Whenever we name a clock after someone we let them cut the first one….and I never heard from him again after that (the design isn’t that bad) and the design kinda slipped between the cracks and just resurfaced here recently. I also forgot my shop key so Tam had to run it out for me. Thanks Tam….

The new clock is a pretty large clock…the floors are 12″ x 18″ and it is 40″ tall. So after digging up the patterns this week I scoped it out and it is gonna take a lot of wood so I started thinking about what I wanted to do. Well I dreamt about it all night and cut it out of the 1/4″ Hickory MDF plywood good both sides. So I checked it out and they had an incredible sheet so that is what it will be made of….dreams know best. The plus’ to using this plywood…other than it looks good….it is stable with very minimal warp, it cuts like hot butter and the MDF interior takes finish really good and darkens up just darker than the vernier so it actually makes the fretwork stand out. All the exterior edges will be covered by hardwood brackets. All this saved me quite a bit $$$ and time in preparation….I would have had to do glue ups on ALL the fronts and backs. The minus’ are that you have to be careful sawing it (run tape along your cut line to minimize splintering of the vernier) and sanding. It is so easy to sand through the vernier. I was able to prep all the primary wood pieces today and the 2 floors and get all my patterns put on….so now it will be serious sawing for a few days. I’m excited to get going on this one….really fun fretwork!

Continue reading

Saturday Update 10/12/13

Hello….hope everyone had a great Saturday and a good couple of weeks. It was a beautiful fall day here today with temps in the mid 70’s and a nice breeze. Over the last couple of weeks I was able to get all my homework cut out which was all the remaining pieces to finish up the Kellar Clock.

Started the day out by stopping into Metro Hardwoods and picking out a couple of pieces of wood for a friend. If anyone is interested, that is something I will do for you…hand pick out any wood you may want. It is on the way to the shop and I stop in most Saturdays anyway. That is one of the little extras we do for our friends of Wilckens Woodworking. But you have to pay for it yourself…   🙂
Continue reading

Saturday Update 9/28/13

Hello….hope everyone had a great Saturday today and a good finish to the week. It was a nice cool day here with rain early but then overcast most of the rest of the day. This past week I was able to get 90% of my homework done…the only thing not finished was the face and face backer for the Kellar Clock.

Today I started out by finishing up the faces for the 2 Anniversary Clocks. Like the faces last week, I cut the number circles out of a 3rd color wood. On these the backer is Walnut, the face is Ash and the numbers are Paduk. The faces were done and all I needed to cut last week was the numbers. So I sanded them and glued them to the face assemblies. Then a co-worker of Mom’s came over to get a couple boards cut so I helped him with that.
Continue reading

Saturday Update 9/21/13

Woooo Hooooo…..Saturday again! Hope everyone had an awesome week and an incredible Saturday. The weather was awesome here today. After some late summer heat this week and a round of big storms, a nice little front came through and it was an amazing day. Mid 70’s with little breeze and a really cool start. This week I traded my shorts for jeans and glad I did.

Started my day with a stop in at Metro to see my buddies and pick up this weeks supplies. As usual went in with a plan….and left with an arm load of wood. The selection this week may be the best I’ve ever seen there! Jeff walked me around showing me the different woods…..and it took all my will power to get out of there with what I did. Several different flavors of Mahogany, Shedua (1/8″ 1/4″ & 3/4″) Bloodwood, Redheart (an awesome selection Brian), Purpleheart, Paduk, and on and on and on. The plan was 1/4″ Paduk…..well there was a piece of African Mahogany (1/8″) that there was just no way I could have left that store without. Sorry the picture just doesn’t do it justice. Dad LOVED Mahogany and we always teased around about it. I would tell him nahhh just not enough grain for me. I’m sure he got a kick out of my reaction today. This worked out good though because today’s plan included several faces for the clocks going right now and I used a good chunk of it.
Continue reading

Saturday Update 9/14/13

Hello…hope all is well on your end and that your week was great. Our week was good here….I actually took a vacation day for myFriday (My Bother-in-Law’s 50th B’Day party was last night and my twin Nephew’s B’day party is tonight) so I used that as my shop day. Today Tam and I rearranged our garage and set up all our patterns and my new drawing file cabinet to be much more efficient. But that also meant that the drafting table got moved out and cleaned up to sell…   🙁   . Many hours of WWW designs were done on the drafting table….back when design was a true art form. This re-arrange will make supporting your orders much easier. (Thanks Tam for your hard work this morning….)

Back to yesterday. The day started early with my bike riding buddy meeting me at Mom’s and we took off to do a trail ride from her house. The trail is 2 miles away so it is a good starting point. The ride is 35 miles total with the first 2 miles being downhill and the last 2 miles being uphill. It was great weather with headwind both directions (nature of this trail) and a hard hard effort. So after the ride and a Subway sandwich I started the meat & potato’s part of the day. (My legs were toast!)
Continue reading

Saturday Update 9/7/13

Hello….hope everyone had a great week, a good Saturday and your Sunday is going good. A friend shared this with me this week and I felt it a wonderful way to get this started off…

TODAY IS THE OLDEST YOU’VE EVER BEEN, YET THE YOUNGEST YOU’LL EVER BE, SO ENJOY THIS DAY WHILE IT LASTS.

It was a good Saturday on my end. Really warm though….made it up to 100*….hopefully summers last hurrah! It was a short day at the shop because of evening plans with my Son Stephen and a childhood Buddy. But I was able to knock out my goal for the day. As with a lot of Saturdays, it started with a stop in at Metro for some wood. I went in with a plan and was overwhelmed to see all the Shedua they had in stock…1/8″, 1/4″, 3/4″ and some really thick. I was able to control myself though and get what I went in for. The 1/8″ Purpleheart was alittle light and the boards were wide which made it warped. The 1/4″ on the other hand was really straight and rich in color. So I ended up with that then went back and forth deciding whether I wanted to plane it to the called out 1/8″ or leave it 1/4″. In the end I decided on leaving it. My experience with Purpleheart is the deeper the purple and the straighter it is…the harder it is also. When I got to the shop I started prepping it for the overlays and wow it was hard. It was bogging the table saw down. So I remembered what a buddy had shared with me a month or so back and thought I’d try it. On any hard wood if you put packing tape on it it will help to lubricate the blade and make it easier to cut. I did this but I also cut a piece of wax paper and put it between the boards (obviously this will only work if you stack cut). This cut like hot butter. So as I worked on assembly, I cut out a couple of the overlays. The rest are prepped and will be homework for this week. Thanks for the tip Dan…hope you’re feeling better!
Continue reading

Saturday Update 9/1/13

Hello….hope everyone had a great week and a good Labor Day weekend so far. We took a little road trip out of town to visit some friends. Their town hosts a big car show cruise night….several hundred cars….so that was a lot of fun. I found my ’66 Chevy truck but couldn’t talk the guy out of it. Good good food also! A trip to his wood store and a day in his shop playing with his toys.

I have a few good subjects to chat about this week….but not a lot of project pictures. The 2 project pictures are of the pediment assembly (I cut mine as 2 pieces). I sanded the edges to get a good fit-up and the edges are very fragile. I sat a flat board (plywood) up against the the sander for support then took a very light pass on the sander….worked great. Then I glued and clamped the 2 pieces together. I clamped them to a flat board (with wax paper between) to assure the assembly is flat. When I get back to the shop I will sand it and fill a seam if there is one. While I was here visiting today, my buddy and I finished cutting out the brackets for the Pyle Clock. Fun to watch others styles as they cut and how they differ from your own. We had conversation about one of my most asked questions…what speed and what blades to use. Both are kind of a preference thing. Speed varies per the wood, thickness, the blade and even the blade wear. As my blade wears I will nudge up the speed some. And blades are a preference thing as well….I recommend just playing with the variations until you hit the ‘feel’. You’ll know when it’s right.
Continue reading

Saturday Update 8/24/13

Hello….hope everyone had a great Saturday. No shop time for me this Saturday but I have some fun subjects to touch on. Today was the company picnic for the company I work for ( www.fike.com ). It was a beautiful weather day here with lower 90’s and a nice breeze. They have a charity that they support year around and at the picnic they have around a dozen raffle baskets that they raffle off. This year I donated my ‘Web Clock’ that I built a couple months back. I was glad that it went over well…and someone put tickets in to win it. So that was fun for me.

Over the last week I was able to get 2/3’s of my homework done so I am well on pace to to be able to finish up the Pyle Clock except for the vine overlays and the face. Next week over Labor Day we will be out of town so no shop time next Saturday either. From a design side of things, I added a double size version of the Micro Mini Grandmother Mini Clock to the full size pattern (WW-0233). This is the Clock Kyle finished up a couple weeks ago and we have had some interest in that so now the patterns includes both. Check it out on the website. We also put a couple new projects on the website. I also worked on finishing up the Anniversary clock pattern. Sorry I’ve been dragging my feet on getting this one available. It is a little more involved since it includes 4 major projects on one pattern. I promise it will be worth the wait.

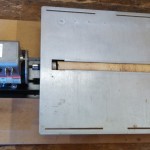
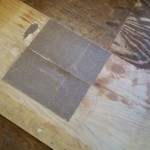
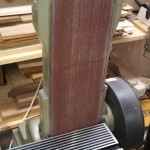
This week I’d like to talk about sanders and sanding. It is something that we all have to do to finish out our projects. I have included pictures of my weapons of choice. There are several different types, brands and options. I have my small hand sander that I use. Like with any sander you need to use them with care to not damage your work piece. I use a small sanding pad to place my work piece on but you can also use a piece of carpet or carpet padding. I also have a larger hand sander and I typically use this sitting pad up and place the work piece lightly on top. With both of these type sanders…don’t apply a lot of pressure when you use them. Let the sander do the work for you. This next one…laugh if you want…is one of my most trusted and beloved sanders. It is a piece of plywood (it was our table top when we had our radial arm saw…sand paper on the bottom) with pieces of sandpaper attached to it by using the spray glue I use for applying patterns. To use it you just lightly move your piece back and forth. I have it set up with course paper for aggressive sanding. But when I have something that I want flat and square…this is the one I most often go to. It is more work but I am old school and Dad just loved this. If by using one of the other sanding methods you get your work piece slightly out of square or rounded….this is the best recovery tool I have used. Simple and cheap also! I also have two basic shop sanders. I have a large disc sander that is heavy duty with a nice tilt table where I do a lot of my angle work. I also have a belt sander that is my quick ‘get ‘er done’ sander. This is also the sander I use for all my contour work. I have a few patterns that require rounded edges and contour sanding such as the Azure Clock and the Jet Fighters. And last but not least is the Sand Flee. This is an awesome machine and has a place in all wood shops. Be sure to watch the link I have included on it. Stephen Raffo does a great job talking about it. Bob and Stephen are very familiar faces at all the shows and great guys to talk to. I have included a few links to check out. Some talk about how to sand, some give maintenance tips and some advertise sanders. One last thing I’ll throw out. It is very important to keep your sanding belts or pads cleaned out. I just use a good gum stick. You can pick these up at any store that carries woodworking supplies. This also gives you more life out of your belts/pads.

Also this week I had a conversation with someone about finishing out the bottom of a box. There are several different things you can do to finish this and give it that perfect touch. First off you can install the small felt pads. This will lift your box slightly off the surface it sits on and helps if you have some unevenness. I place these in from the edge so they don’t show. Along this same thought process….even though I haven’t…yet…you could Flock the bottom and this would give you a nice soft bottom surface. Then there is the option of small brass feet that you just put on the corners with small nails or screws. I have used these a lot. I get these from Wildwood/Cherrytree but you can get these at hobby stores also. I actually have a pattern that includes some of these…..just went and found it. This may be a good pattern to throw up on the web-site. Look for that to be there soon.

My last subject for the week is the Shop Project I started about a year ago….the memorial fretwork pieces to honor Dad. When I went through and cleaned up the shop after Dad passed away, I gave some of the older equipment we had to my Brother Scott and bought a nice work bench cabinet. But it is very plain….so I designed fretwork for it and then got the idea to let all Dad’s friends cut out a piece for it. I handed out several patterns and got about 2/3’s of them back. I ask people to cut it out of a scrap of their favorite wood and I would turn it into a colorful memorial that would honor Dad….a big memorial to him made by his friends and displayed in his shop. It is STILL his shop…..I just use it….because of the magic that lives in those walls. Well I just came across the box of pieces last week then someone e-mailed asking about it again. So I plan on bringing some focus back to this project. If anyone is interested in being a part of this just let me know. When I get back to the shop I will take an inventory and see which pieces I still need. I have marked each piece and know who did each one and will have this marked and I plan on doing a write up on it as well….maybe get one of the mags interested in running the story on it. Dad was/still is Loved by many and one of our Icons in our discipline of woodworking.

That about does it for another week. Hope everyone has a good Sunday and your upcoming week is spectacular. Again this week please keep all of our woodworking brothers and sisters who are struggling or hurting in your prayers. Also be sure to check out our approved vendors and catch us at www.wilckenswoodworking.net and on facebook. Look for our ads in S.A.W. and Creative Woodworks & Crafts. We have several new things available right now along with ALL the old stuff. If we’ve had it…we still do. Don’t be a stranger….drop us a line to say hey….we love talking to ya. Send us pictures of what you have going so we can share those and if you’ve cut out the free Web Clock…send us pictures of that. I know several of you that have been working on it but we have received only a few pictures. Remember that the best one (voted by your peers) will receive a premium pattern. Have a great finish to your weekend and a good week next week….and as always…

Until Next Time, Keep the Saw Dust Flyin’…..

Dan

Saturday Update 8/17/13

Hello and happy Saturday to everyone. Hope you all had a great day and a wonderful week. Is this really late AUGUST? We have been enjoying late September conditions here with some nights that were very cool….50’s! The shop was extremely comfortable today. Usually in July and August I spend a few warm Saturdays in the shop but this year there has maybe been one that was uncomfortable.
Continue reading