Hello….hope everyone had a great Saturday today and a good finish to the week. It was a nice cool day here with rain early but then overcast most of the rest of the day. This past week I was able to get 90% of my homework done…the only thing not finished was the face and face backer for the Kellar Clock.
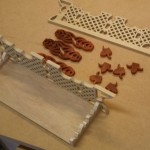
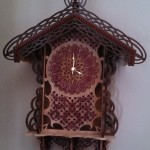
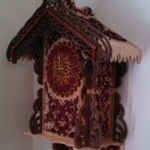
Today I started out by finishing up the faces for the 2 Anniversary Clocks. Like the faces last week, I cut the number circles out of a 3rd color wood. On these the backer is Walnut, the face is Ash and the numbers are Paduk. The faces were done and all I needed to cut last week was the numbers. So I sanded them and glued them to the face assemblies. Then a co-worker of Mom’s came over to get a couple boards cut so I helped him with that.
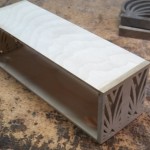
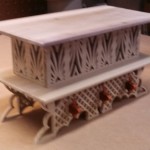
I then sanded all the Kellar Clock pieces I cut out last week. I started today’s assembly by gluing the box sides to the box supports. This is basic box assembly. Once the sides and supports were glued together I glued the front and back on. I added a hole in the back so that I can later add a light. On box assemblies I try to leave the front and back a little long to be able to sand the ends in flush. If it is the opposite, you have to sand the entire side piece to get it flush…much more work.
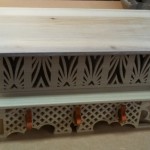
As these were gluing up I prepped all the rest of the wood to finish this clock. On the base I glued the sides to the support, sanded the 3 piece assembly flush (checking it to keep it square) and glued the back on centered. I then cut out the inner and outer braces. These need to be put in first before you can glue the front on. So after they were cut and sanded, I installed the braces and glued the front on. I then sanded the top flush. I finished this by gluing the brace caps on, lining them up with the rectangular cutouts.
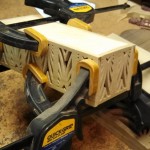
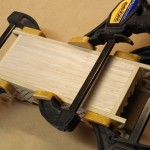
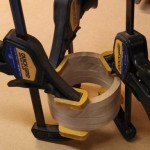
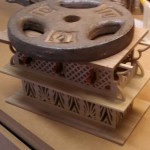
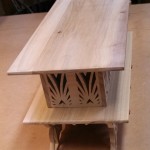
For the two floors I had to do glue ups. I then cut these to size and sanded them, slightly radiusing the edges. I glued the box centered in between the two floors just using squeeze clamps. I then glued the base onto the bottom of this assembly. My base assembly was good and flat so I was able to just put a board down and my weight plate. To clamp it, I would CAREFULLY clamp on the 4 feet portions. This is very fragile and will collapse with much clamp pressure.
As I prepped the wood for the crown, I did a glue up using a piece of 1/4 Yellowheart. After this was glued up I noticed it was supposed to be 1/2 instead of 1/4…..so I laminated another type to it….but you gotta wait to see what I did. I then cut out the 4 rings for the ring assembly between the front and the back of the main clock panels. Next time I will sand the outside and the inside of the ring assembly round and flush. The original design was for an insert clock movement but I wanted to use a quartz movement and one of my wooden faces….so I opened up the hole in the rings and the back panel. I also changed the hole in the front panel to 3/8″ diameter.
Although this doesn’t sound like much, it was a full and productive day. For homework this week, I have the clock front overlays, the crown, the box brackets and the face. I also have to make a piece for the clock that was replaced this week on my wall by the finished Pyle clock. I took it in to work this last week and it seemed to be a big hit with everyone. There was a common theme with everyone….they liked the quarter sawn Sycamore. Next week there will be no shop time on Saturday and probably no Update.
This week at work we were cleaning out our Engineering library. I came across 3 books with Mr. Fike’s name in the front so I took them over to him. One was a book on Chemical Engineering (dated 1956) and 2 on Tool Design (dated 1943, in mint condition)….as most of you know, I’m a Tool Designer so these 2 interested me. He was excited to get the one back on Chemical Engineering but had no interest in the tooling books….they were his Dad’s….the founder of our company. He told me, if I was interested I could keep them. It was hard to contain my excitement with this. I promised him that as long as I had them I would take care of them. So I’m thinking a fretwork box may be required to do this….I have a plan. 🙂
Well that about does it for another week. Hope everyone has a good upcoming week ….enjoy fall as it arrives. Again this week please keep all of our woodworking brothers and sisters who are struggling or hurting in your prayers. Also be sure to check out our approved vendors and catch us at www.wilckenswoodworking.net and on facebook. Look for our ads in S.A.W. and Creative Woodworks & Crafts. We have several new things available right now along with ALL the old stuff. If we’ve had it…we still do. Don’t forget we have more mini clock books available. These have been popular so far…be sure to get your copy. Don’t be a stranger….drop us a line to say hey….we love talking to ya. Send us pictures of what you have going so we can share those. I don’t have much else so have a great finish to your weekend and a good week next week….and as always…
Until Next Time, Keep the Saw Dust Flyin’…..