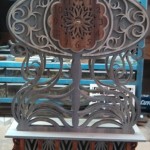
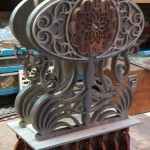
Hello….hope everyone had a great Saturday and a good couple of weeks. It was a beautiful fall day here today with temps in the mid 70’s and a nice breeze. Over the last couple of weeks I was able to get all my homework cut out which was all the remaining pieces to finish up the Kellar Clock.
Started the day out by stopping into Metro Hardwoods and picking out a couple of pieces of wood for a friend. If anyone is interested, that is something I will do for you…hand pick out any wood you may want. It is on the way to the shop and I stop in most Saturdays anyway. That is one of the little extras we do for our friends of Wilckens Woodworking. But you have to pay for it yourself… 🙂
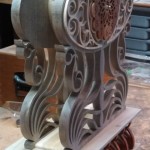
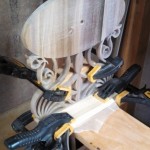
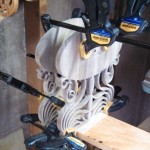
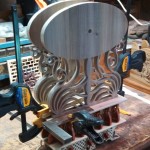
Once I got to the shop I started in on the Kellar Clock by sanding all the pieces I had cut. I then glued the lower spacer board to the inside of the body front. While this was gluing up I sanded the inside and the outside of the top spacer ring assembly. I sanded the outside on the belt sander and the inside with the oscillating sander and finished it on the drill press with a sanding drum. I then glued this to the inside of the body back. Before you do this step, check the thickness with the width of the lower spacer board. Once the two body half assemblies were dry I glued them together and checked across the assembly from front to back in several places with a square. After this assembly dried, I sanded the bottom flush.
While these assemblies dried, I custom sanded each of the box brackets to fit to each spot. When I cut them out I left them long to be able to do this. I checked each with the square as I went. I only put glue on the back edge and put them into place. If you put glue on the top and bottom edges, you will get glue smear and it would need to be cleaned good before the finish is applied. The next step was to glue the body assembly to the box assembly. I started by clamping a square in place to have a stop when I clamped it in place. I just measured the side to side dimension. I put a scrap board across the inside of the body to clamp across to the floor.
To finish it up, I glued the front overlays on and the crown. The pattern is designed to use an insert but I wanted to use one of our wooden faces that goes well with the design. But once I tried the clock movement….the buildup was just a bit too thick. I decided to cut the inside out of the clock face to clear the nut but when Tam stopped by, she had a better idea so I will try that this week. Since the wood is really beautiful where the face would go, she suggested just cutting out the numbers and along with this I will come up with some little center piece with 12 points so I can get the numbers positioned correctly.
For the rest of my day I repaired the clock I took down for the Pyle clock. The center lower bracket had a piece broken out so I cut out a new one and glued it on. I will refinish this one and it will be as good as new. I also worked on the quilt rack that I was working on earlier this year. It is to display the Koi quilt my Daughter Kishna made us for Christmas last year. We are planning to redo our bedroom with a Koi and fish theme. The end pieces are made from a pattern I found of a fancy goldfish. While we were in Chicago a few weeks back, we found the perfect rod for the rack. It is a fancy turned rod that is quartered out to fit on a corner. So I cut out a couple of pieces to fit in my end pieces that this rod will rest on. I also had to open up the radius on my end pieces. Now we just need to work on our room so I can put it up.
I also started on the box to display the two old tooling books from the founder of the company where I work. The box will be made from 1/4″ Shedua and the lid overlay with be made from 1/4″ Hard Maple. I am planning on doing the overlay using the calipers, micrometer and depth micrometer from my Measuring Time pattern. The inside will be flocked…not sure what color yet….the books are an army green color.
I finished up the day by getting out all the pieces for the shop cabinet project that several of you have cut pieces out for. I had handed out most all of the patterns I needed but I only have about 1/3 of the pieces I need to finish this. Back ground on this…after Dad passed and I cleaned up the shop, I purchased and installed a cabinet workbench unit but it is very plain. I designed fretwork to go on it and came up with the idea to have Dad’s friends cut out pieces for it. This will be a wonderful memorial to Dad once it is complete. I will do a drawing showing who cut each piece and will do a write up on it when its done. If you’d be interested in cutting a piece for this just let me know.
Over these past couple weeks I also finished up the model for the Sharbono Clock which is the next new big clock. It is 24″ tall x 26″ wide x 8″ deep with cathedral windows and overlays and fountains (water isn’t real) on two of the levels. This is designed for and named after a friend of the family who is battling cancer and is a scroller. I will attach an interactive pdf file here. To activate it, just click in the background and hold down your mouse button to rotate it around. Let me know what you think! I have also started the design on the next wall clock. More on that to come.
Well that about does it for another week. Hope everyone has a good upcoming week ….enjoy fall as it arrives. Again this week please keep all of our woodworking brothers and sisters who are struggling or hurting in your prayers. Also be sure to check out our approved vendors and catch us at www.wilckenswoodworking.net and on facebook. Look for our ads in S.A.W. and Creative Woodworks & Crafts. We have several new things available right now along with ALL the old stuff. If we’ve had it…we still do. Don’t forget we have more mini clock books available. These have been popular so far…be sure to get your copy. Don’t be a stranger….drop us a line to say hey….we love talking to ya. Send us pictures of what you have going so we can share those. I don’t have much else so have a great finish to your weekend and a good week next week….and as always…
Until Next Time, Keep the Saw Dust Flyin’…..