Hello hope everyone is enjoying a fun and safe Memorial Day weekend. We should start this week by taking a moment to honor and remember those who have gone ahead of us…..also the brave Men and Women who defend this great nation of our and allow us to be able to enjoy the freedoms we enjoy….Thank You!
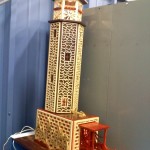
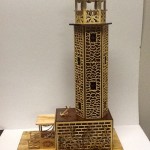
This week I took a couple extra vacation days from the primary job to stretch the weekend into a 5 day weekend and since we had a wedding for an extended family member today, I made my sawdust on Friday this week. I had a few stops to make early then made it to the shop around one. This week was dedicated to working on the Anniversary Clocks. Over the week I cut out the brackets for the Wall Clock and one of the lower backs for the Wall Clock. Once I got to the shop I prepped the wood for the roof panels for both clocks, the Wall Clock being a glue-up.
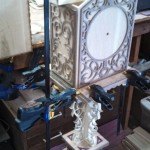
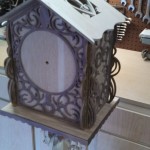
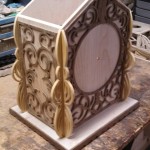
I then cut out the brackets for the Floor Clock and the roof panels for the Floor Clock. While I was cutting these out I glued the head sections for both clocks to their respective floors. I did both basically the same way but only show a picture of the Floor Clock. First off I started by clamping straight edges to the front and one side of the floor at the correct location. This takes a few minutes to get it right. I always just set the head section on (or whatever I’m gluing on) and double, triple, quadruple check the dimensions. When I’m good with the placing for the straight edges, I put glue on the bottom of the head section and set it into place. I usually let it set for a minute of two to let the glue start to set up. Be careful though because some days it sets up quicker than others (temp, humidity etc). Then I placed a long board across the top of the sides and with long clamps, I clamp across it. Clamp the side opposing the straight edge first and only lightly. Clamp the other side tight and the tighten the first side. This drives it into the straight edge. In this application I also put a clamp in the back door opening to under the floor. Basic simple assembly steps but if your new to clock assembly this can be tricky and may take some practice. Rule of thumb…..ALWAYS do a dry clamp first and double/triple check things before you apply glue.
I sanded all the brackets and glued them onto the assembly. If you are good and careful with all your assemblies and the straight edges of your brackets are good and square, you can lay the head section flat and apply the glue to your brackets and set them into place and they should fit up. A couple of mine I had to hold in place for a couple minutes while the glue set up. If things aren’t square and straight you will need to do some creative clamping.
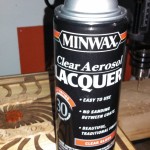
This pretty much finished out the day for me….it was a shorter than usual day. This week I will have the WC roof panels to cut out and the 2 remaining lower pieces for the WC. This last week I was able to get the finish on the Memorial Box which gets me to another thing I’d Like to share this week. For years Dad and I used a mixture of Linseed Oil and Mineral Spirits (to thin it to spray on) then recently I switched over to a polyurethane spray which you have to be extremely careful and patient with. Well I have discovered a new (at least first time I had seen it) finish. It is a lacquer spray by Minwax and it is AWESOME! You still have to use some care but it is 100x more forgiving if you get alittle heavy. Also it dries completely to the touch in 30 minutes. On the box I put on 6 light coats and it is a gloss finish like the poly but not as ‘deep’ looking. It comes in satin, semi and gloss which I used and it was a very nice gloss finish. I’m impressed and will be using this as my finish of choice. It was roughly $1 more that the poly and worth every cent. Give it a try….I included a picture of the can. Yeah it still smells as bad as the poly spray does…..be sure and ventilate.
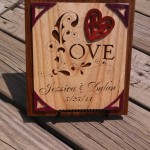
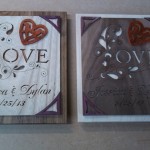
I also will stop teasing with the Wedding Gift and include some pictures this week. It was done by using their wedding announcement and I included their first names blown up from the announcement. I cut it out of ash with a shedua backing, purpleheart corners & a paduk heart. When doing something like this I always do a back-up…just in case. The backup was walnut on poplar. I was very pleased with how good the letters turned out. The picture of the letters would have been better as a straight on picture. I have always enjoyed the lettering but before my eye surgery it was a struggle. They didn’t see it yet before we left today….can’t wait to hear what they think. The Brides Grandfather is who I’m designing the new large clock for that I talked about a couple of weeks ago.
Design wise, the Lighthouse pattern is done. It is at the printers right now getting my copies so I can build it next. Any of you that are interested in getting a copy before we get it on the website….just contact me. Two of my buddies have built it already….I’ll include pictures. It has a pulsating light (not included) that strobes like a real lighthouse and the final drawings include a rope fencing around the floor. I have also started in on detailing out the new design I’ve been talking about which will be a brother style clock to the Orlean’s Cathedral clock. I stopped in at the printers Friday and they are getting ready to move forward with the mini clock book. All that is left is that back page still. Kyle and I just need to find about half a dozen of the clocks to take pictures.
I still haven’t received any pictures for the website clock yet. Hope at least a few of you took advantage of the pattern. Remember the contest for it. Don’t forget to check us out at www.wilckenswoodworking.net and on Facebook…we have added new pictures this week of friends projects. Hope everyone has a fun and safe Memorial Day Holiday weekend and a great week next week. Also please check out our approved vendors. And as always…until next time…keep the sawdust flyin’….