Hello…hope everyone had a great Saturday. I want to start by wishing all the Mom’s out there a Wonderful and Happy Mother’s Day. Happy Mother’s Day Mom…..I Love You. Also to Tammy….Thank You for being an incredible Mom to our kids and I Love you as well. Be sure and give your Mom a hug for us at Wilckens Woodworking.
The weather was nice here today but breezy. I had to turn on the fans today….but I’m not complaining. It wasn’t snowing! My day started off by our dogs getting out and one of them ran off. So after looking and looking with no luck it was off to the shop. My heart wasn’t in it today and I struggled most of the day. Had a close call on the table saw early on….just wasn’t thinking clearly. I still have all my fingers but felt the blade…it was that close. I was cutting up the wood for the floor/lids trim for the Memorial Box and I had just enough 1/8″ walnut to do it….well I cut one board (2 trim boards) about an 1/16″ too short. So I planed down a piece to get enough. Stepped back and took a deep breath and things got better. I was able to get all the wood prepped for the trim and then my Daughter & Granddaughter stopped by 🙂 . After they left I got all the trim cut, sanded, assembled to the floor/lids, re-sanded, gaps filled and final sanded.
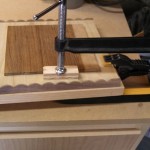
On these I cut them long and custom sand the side ones to fit exact (be careful that the end are square with the straight side). I then glue and staple them on. Then I install the front and back ones and sand them flush on the ends. After this I fill the staple holes and any seams with glue and sand them….this fills imperfections wonderfully. Then I fill the gaps along the top and sand them and slightly round the corners. At this point I sand any mismatch on the scalloped side corners to blend it all together. Finally I do a final sand on the entire piece and hit it with steel wool to give it a nice shine. It is a drawn out process but the end results are worth it.
If you are working with a board that is warped, as I was today, clamp it to a board that is straight before you start. I have a couple deep throated C-clamps for reaching well in to a work piece. Money well spent! Then once you glue and staple the trim on…it really straightens the warp.
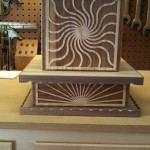
I was able to get the trim put on and the lower & upper boxes glued to their floors. Next week will be assembling the corner brackets and the rest of the overlays to the box. All that is left to cut is her name and dates. I called it a day early and went home to ride my bike around the neighborhood looking for Bleu….rode past dark, no luck.
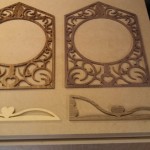
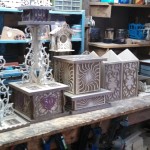
This last week I was able to get the wedding gift front cut out and I was very pleased with how great the letters turned out. Amazing what a little eye surgery will do for you. (Pictures in a couple weeks). I also cut out the front head section overlays and crowns for the Anniversary clocks. This week I have a small overlay to cut for the wedding gift and the brackets for the head sections. The last picture in the group is ALL the projects I currently have going (wedding gift not shown).
Everything for the mini clock book is at the printer now except the back page….which Kyle and I have planned to finish up tomorrow. Very very excited about this. It has 175 pages and 120 mini clocks. My goal is to make this the working man’s scrollsaw book. I have tried to make this the kind of book I would want to buy. Also we have added pictures to the Customer photo page of the website www.wilckenswoodworking.net and also on facebook this week…..some very impressive pieces! Go check these out and don’t forget about our approved vendors…they can help you with things I can’t.
Well that about does it for another Saturday Update. Hope everyone’s weekend finishes out good and everyone has a great Mother’s Day. And as always….Until next time, keep the sawdust flyin’…..