Hello….hope everyone had a great week, a good Saturday and your Sunday is going good. A friend shared this with me this week and I felt it a wonderful way to get this started off…
TODAY IS THE OLDEST YOU’VE EVER BEEN, YET THE YOUNGEST YOU’LL EVER BE, SO ENJOY THIS DAY WHILE IT LASTS.
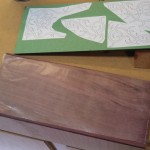
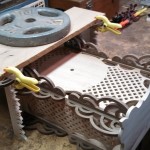
It was a good Saturday on my end. Really warm though….made it up to 100*….hopefully summers last hurrah! It was a short day at the shop because of evening plans with my Son Stephen and a childhood Buddy. But I was able to knock out my goal for the day. As with a lot of Saturdays, it started with a stop in at Metro for some wood. I went in with a plan and was overwhelmed to see all the Shedua they had in stock…1/8″, 1/4″, 3/4″ and some really thick. I was able to control myself though and get what I went in for. The 1/8″ Purpleheart was alittle light and the boards were wide which made it warped. The 1/4″ on the other hand was really straight and rich in color. So I ended up with that then went back and forth deciding whether I wanted to plane it to the called out 1/8″ or leave it 1/4″. In the end I decided on leaving it. My experience with Purpleheart is the deeper the purple and the straighter it is…the harder it is also. When I got to the shop I started prepping it for the overlays and wow it was hard. It was bogging the table saw down. So I remembered what a buddy had shared with me a month or so back and thought I’d try it. On any hard wood if you put packing tape on it it will help to lubricate the blade and make it easier to cut. I did this but I also cut a piece of wax paper and put it between the boards (obviously this will only work if you stack cut). This cut like hot butter. So as I worked on assembly, I cut out a couple of the overlays. The rest are prepped and will be homework for this week. Thanks for the tip Dan…hope you’re feeling better!
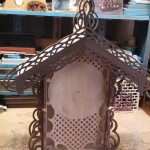
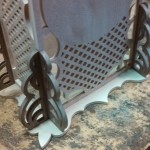
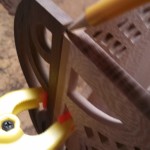
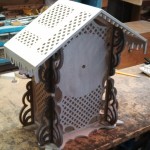
Onto the assembly…I started by sanding all of the brackets. I first worked on getting the bottom 6 brackets glued in place. The first step is to choose where you want each bracket (wood color and grain flow) then I custom sanded each one to fit against the floor and the body. Making them all fit perfect, I just applied the glue and set them in place. I used my small square to make sure they were square with the body. I did check all my squares to verify them (refer back to last week’s update). After these set up I glued the upper side brackets on. I laid the clock over on its side and set these in place. I checked them with a straight edge. I flipped the clock over and did the opposite side the same. Before I glued the side brackets on, I clamped the front brackets in place and marked the angle. I then set my disc sander and sanded these angles. For gluing them in place I laid the clock on it’s back and glued them in place. I did not clamp any of the brackets because the fit up was really good, you may want to clamp them with small clamps. I verified the placement with a straight edge.
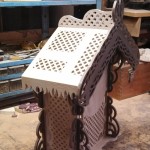
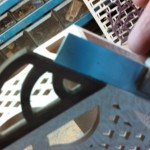
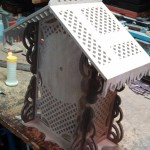
Next came the roof panels. They had developed some cup to them because they had sat for a couple weeks in a very hot shop. So the first step was to clamp them to a piece of plywood to straighten them out. Then I glued the end pieces on lining up the back edge….note these pieces still had a square end on them. I held them for a minute or so then put masking tape to hold them in place. Once the glue set up I sanded these flush on the belt sander. Take care doing this….it can get away from you quickly. Mine turned out really good….I was pleased. I then taped the 2 roof panel assemblies together and set them on the clock assembly to check out the fit up. All looked good so I put my glue on the clock and a small bead in the roof seam. I set these in place and allowed the glue to dry. The good fit up allowed me to do this with no clamping, you may want to use a strap clamp or a large bean bag you could lay over the roof. I have also in the past made up 2 pieces with the angle cut in them and a weight set on the top.
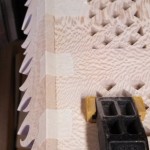
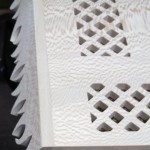
The next step is to sand a flat on the top for the crown to sit. I sand them on the belt sander but some folks cut the angle on (that would be harder for me to get correct). This is a step that you need to sneak up on and check often during the process. I like to make my flat a bit large and round the edge to blend it in. This one turned out good and the crown was good and vertical. I placed a flat surface against the front and butted the crown up to it. As this dried I filled and sanded the seam in the pediment assembly. I also sanded the minor mismatch I had in the cutouts. Finally I glued this to the clock assembly (after a dry fit-up to check it). I applied my glue and got it where I wanted it then set on a straight board with a weight on it. I clamped the ends.
This wrapped up my day at the shop. I wanted to get the assembly to this point. Was hoping to cut more on the vine overlays but those will go quick. Next week (another short Saturday) I hope to get the lower assembly on the clock and the finished overlays glued on. This is a really fun project and a good one for those of you wanting a good middle of the road clock that looks good. This pattern is currently available on the website.
That about does it for another week. Hope everyone has a good upcoming week as the summer winds down. Again this week please keep all of our woodworking brothers and sisters who are struggling or hurting in your prayers. Also be sure to check out our approved vendors and catch us at www.wilckenswoodworking.net and on facebook. Look for our ads in S.A.W. and Creative Woodworks & Crafts. We have several new things available right now along with ALL the old stuff. If we’ve had it…we still do. Wow….thanks to you that made the debut week for the Anniversary Clocks/Boxes a good one. Also we have more mini clock books available. These have been popular so far…be sure to get your copy. Don’t be a stranger….drop us a line to say hey….we love talking to ya. Send us pictures of what you have going so we can share those and if you’ve cut out the free Web Clock…send us pictures of that. I know several of you that have been working on it but we have received only a few pictures. Remember that the best one (voted by your peers) will receive a premium pattern. We added a few new project pictures this week…so check them out. Also I plan on pulling out the pieces for the Shop Memorial Cabinet. If you are interested in being a part of that let me know. We received about half of the patterns we originally handed out. Look for more to come on this. Have a great finish to your weekend and a good week next week….and as always…
Until Next Time, Keep the Saw Dust Flyin’…..