Hello…hope all is well on your end and that your week was great. Our week was good here….I actually took a vacation day for myFriday (My Bother-in-Law’s 50th B’Day party was last night and my twin Nephew’s B’day party is tonight) so I used that as my shop day. Today Tam and I rearranged our garage and set up all our patterns and my new drawing file cabinet to be much more efficient. But that also meant that the drafting table got moved out and cleaned up to sell… 🙁 . Many hours of WWW designs were done on the drafting table….back when design was a true art form. This re-arrange will make supporting your orders much easier. (Thanks Tam for your hard work this morning….)
Back to yesterday. The day started early with my bike riding buddy meeting me at Mom’s and we took off to do a trail ride from her house. The trail is 2 miles away so it is a good starting point. The ride is 35 miles total with the first 2 miles being downhill and the last 2 miles being uphill. It was great weather with headwind both directions (nature of this trail) and a hard hard effort. So after the ride and a Subway sandwich I started the meat & potato’s part of the day. (My legs were toast!)
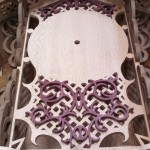
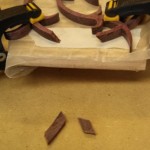
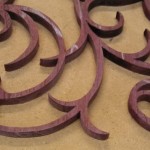
My goal for the day was to get the lower portion of the Pyle Clock glued on and all of the Purpleheart overlays sanded and glued on. I was able to get about 75% of my homework done this week….which was to cut out all of the overlays. That Purpleheart was really hard and a challenge to cut out. Remember I decided to leave these 1/4″ thick instead of 1/8″ for stability….since 1/8″ PH isn’t. I have a Love – Hate relationship with PH. Love it finished on the project….Hate working with it. It is very brittle as well…which takes us to our first topic….fretwork repair.
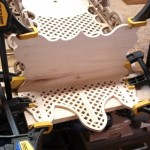
We’ve all been there….about finished with a tough piece and for whatever reason…it breaks! On all these overlays I only had 3 repairs which is good for PH. I start by cleaning off any fuzz and making sure the edges look OK. Then I clamp it to a good straight board with wax paper down first and also a piece of masking tape to hold the little pieces in place. As with EVERYTHING I do a dry fit-up to see how the pieces go together. Once I’m happy with that I put the glue on and put the pieces together. I’m not conservative with the glue in an application like this. After this has set up I sand it and use my small woodworking files on the spots to clean it up. 9 out of 10 time you won’t be able to find the spot. 🙂
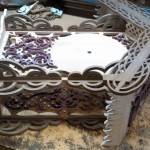
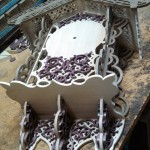
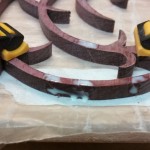
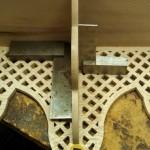
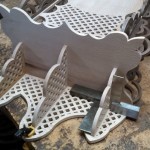
On to the clock assembly. I started by clamping the clock assy to a flat board and butting the lower back piece up to the bottom. I had to do a small amount of custom sanding for a good fit up. The piece had some cup to it so I clamped it flat and up to the bottom of the clock assembly. From here I glued the lower brackets in place. These were perfectly square….but didn’t fit perfect so I did some custom sanding on these as well to allow them to sit perfectly in place. And since they fit up that nicely, all I had to do was apply my glue and sit them in place. Note how I used my squares to get them good and square with the assembly. Sorry…I’m a Tool & Die guy…..it has to be perfect. Less than perfect isn’t acceptable. Dad was the same way… 🙂 We’d even compete! If you listen to nothing else I say….the one most important thing is to make every piece as good and square as possible. On the outer brackets I followed the same steps.
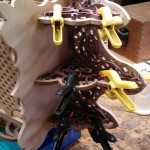
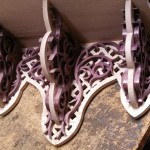
At this point it was time to glue on the overlays. On the lower brackets I clamped them in place making sure they lined up on each side. For a lot of the other overlays I laid down a piece of plywood (good -n- straight) and sat a full can of linseed oil on it for weight. The roof panel I got lucky and those overlays needed no clamping. I then clamped the crown overlays on making sure they lined up. This got the Pyle clock to about 95% complete. I need to put on the back door next week…ahhh those dreaded hinges. And also need to cut out the scalloped overlays and start on the face. (Check out our fretwork faces on our website…4 sizes with 10 designs each). Sorry Mom…..this one is going on my wall….! You can have the next one.
I love the Geico commercial with the camel…..sorry I got distracted….
Speaking of the next Project….I prepped up the base pieces and lower box pieces for the Kellar Clock which is named after Mr. Kellar…a good friend of WWW. This is kinda similar to the Boussum Clock (one of my all time favs). It has a base then a box and then the clock portion spaced apart with spacer rings…..you’ll understand in a week or so. I will be making this from the wood I picked up in Chicago a couple weeks ago. Very colorful Poplar with the contrasting pieces out of Paduk. Keep in mind….I’m still 80 projects behind. Some are very over the top (You know me). So there is still a lot of water in the well (or beer in the keg).
On the design front I have been working hard to get the model done for the next big Cathedral clock. This one may be the one to knock the Orleans Clock off it’s pedestal. (I love teasing you guys…..) Also it was pointed out to me this week that on the Anniversary Clock that I left the quantities of the material lists. Since this was a 4 project pattern I made up individual material lists and I left that off….I’ll get that fixed and out to everyone who has ordered that one. Be sure to check it out on our website. 4 projects on one pattern! A large floor clock, a wall clock that pushes the edge, a small box and a large box. It can be built for any anniversary number. This one was designed for Mom & Dad’s 50th.
Speaking of Dad…..this Tuesday will be the 2 year anniversary of his passing. We lost a hell of a man that day….please take a minute on Tuesday and think about him. A lot of you knew him and he touched your life in a positive way. I couldn’t carry his boots on my best day! I LOVE YOU DAD and you are a positive part of every day of my life….I miss you……
OK….on to a couple other topics I’d like to touch on this week. I had a friend ask about assembly this week and gluing and screwing pieces together. I use glue on everything and in an application that it will work and help out, I use my air stapler. This adds so much strength to a project. And the nice part….add a spot of glue and hit it with a sander and you’ll never see the spot.
Also I talked a couple weeks ago about re-sawing and planing/sanding. A friend e-mailed me after that (sorry I forgot to add it last week) so I will add his info here….Great Info Dave….Thanks for sharing!
“I couldn’t help but notice that you also resaw small pieces of wood. I’ve done this for years now and it sure beats planning a 3/4” to 1/4”. I can only resaw about 8” on my Sears Professional band saw. One thing I’ve found, if the blade is starting to get dull, it may cup with the grain of the piece of wood that I’m cutting. I’ve had this happen quite a few times. Blade tension is another thing to watch also. I make up my resaw blades from 1/2” x 3 tooth saw blade stock. I bevel the ends and put it in a home made brazing jig. I’ve been getting my coils from Woodworkers Supply.
Because I don’t have a drum sander to finish off the pieces, I edge glue runner strips to the board to eliminate planer snipe. I make mine out of cut up 2×6”s and they have to extend beyond the snipe of your particular planer (my planer has a 3” snipe). The runners also help with the board is short so there’s contact with both the infeed and outfeed rollers before the board clears the infeed roller. This helps prevent short board from jamming in the planer. I also put runners on tropical hardwoods or other expensive wood to salvage the snipe area. ”
That about does it for another week. Hope everyone has a good upcoming week as the summer winds down…..snow will be flying before you know it. Again this week please keep all of our woodworking brothers and sisters who are struggling or hurting in your prayers. Also be sure to check out our approved vendors and catch us at www.wilckenswoodworking.net and on facebook. Look for our ads in S.A.W. and Creative Woodworks & Crafts (which came out this week). We have several new things available right now along with ALL the old stuff. If we’ve had it…we still do. Don’t forget we have more mini clock books available. These have been popular so far…be sure to get your copy. Don’t be a stranger….drop us a line to say hey….we love talking to ya. Send us pictures of what you have going so we can share those. Also I still plan on pulling out the pieces for the Shop Memorial Cabinet and see what I need. These last couple weeks have been busy. I do want to get this going and there couldn’t be a more appropriate week. If you are interested in being a part of that let me know. We received about half of the patterns we originally handed out. So if you got a pattern and still want to be a part of this….just let me know. Look for more to come on this. I don’t have much else so have a great finish to your weekend and a good week next week….and as always…
Until Next Time, Keep the Saw Dust Flyin’…..